Showing posts with label sewing. Show all posts

Friday, June 15, 2012

project: faking a cover stitch hem

I love working with knits; they are a fabric that usually gets passed over by home sewers because in-experience working with them or not having a serger at home.  One other reason they get passed over is because most knits (say, t-shirts) we purchase in the store, is that it's sometimes difficult to replicate the finishing techniques at home.

Worry no more.

It's maxi dress season here in Chicago, and I purchased two of them and both were too long on me (even in 4" wedges).  They are made of a modal jersey fabric, so they are super drapey and stretchy.  They are, by far, the most comfortable thing to wear on a warm summer night while patio sitting.

I finally got around to hemming them, and since I don't own a cover stitch machine to create the hem the dresses came with, I had to fake the hem.  The hem I'm talking about is that that double stitched hem you see at the bottom of your t-shirts or knit dresses.  The one that has the two stitches on the right side, and loops on the wrong side (or inside) of the garment.  Yeah, that one!

So this is how we fake it, and you do need a serger.  Start by cutting off the excess fabric, and then you are going to do a single layer serge along the raw edge to give it a clean finish. 


Then you are going to pin up your hem allowance (I usually like to do a 1" hem on knits to give them some stability and weight).  PLEASE NOTE: if your knit is extremely drapey or super stretchy, you might want to fuse a layer of tricot interfacing to the raw edge line.  This will help give the knit even more stability and structure when you're sewing.  I didn't do this, because my knit is a medium weight and was controllable.

When you're pinning your hem up, you will want to pin it from the RIGHT SIDE OF THE FABRIC.  This is the side we are going to be stitching on.  Tricky, I know, but the end result will be worth it.

The next thing you're going to do is thread a DOUBLE NEEDLE on your machine.  Yes, we will be using a double needle!  I tend to use the little wider needles (say, 4mm), but it's up to you.  Be sure your presser foot has an opening wide enough to fit the double needle!  I can't count how many times needles have busted because the foot opening was small.

Double needles are really easy to use and look awesome on the fabric.  I did increase my stitch length ever so slightly to help with the tension of the needles and the knit.

The next step is, from the right side you have pinned, use the serged edge of your fabric (that is on the under side now) as a guide to line up along your foot as you begin to sew.  The closer you can get the double stitching to the serged edge underneath, the more it will look like a cover stitched hem.  Be sure to back stitch at the beginning and end of your rows!

This is what the hem should look like when it's all done!

Here is a right side/wrong side view of the finished hem
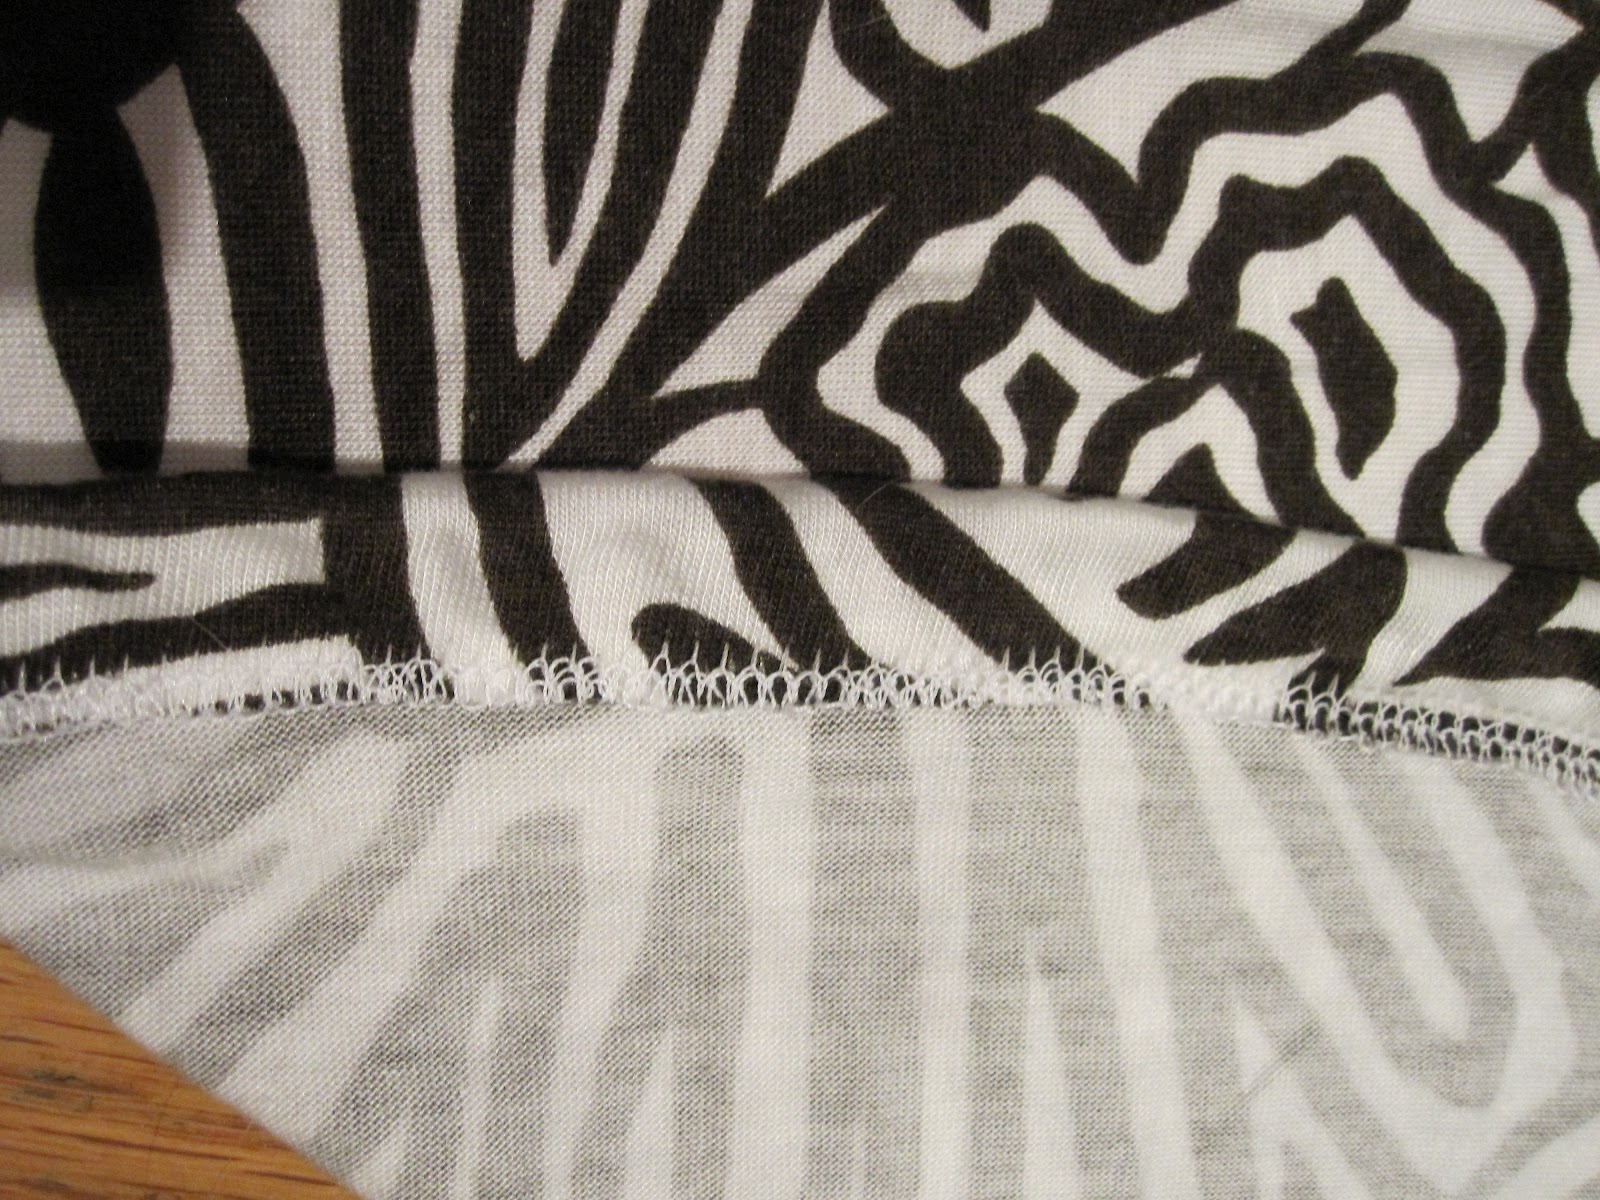
Here is a close up of the wrong side

And that's it!  Now you should be fearless of knits and faking a cover stitch hem!  I'm pretty sure I will be wearing one of these maxi dresses to the Taste of Randolph fest tonight too.  Los Campensinos! and Those Darlins are playing, and I couldn't be more stoked!


Sunday, June 10, 2012

project: bra cups

It's summer, y'all, which is the season of slinky summer dresses!  My friend purchased a dress that is an ideal summer dress, but it had one problem: you can't wear a bra with it.

No way a bra could be worn with this hot number!

So here is the tutorial on what to do when bra cups are a necessity:

First thing is to have your lady try on the dress, and position the cups in the right spot on her.  Gravity is a tricky thing, so make sure she is not wearing a bra so the cups will be in the perfect position when the dress is worn!

Pin the cups into place from the outside of the dress, and then you will want to figure out the best place to seam rip to place the cups it between the fashion fabric and the lining.  Be sure to either thread mark or pin an outline where the cups will be placed inside the layers before you remove the original fitting pin!


I decided to use the armhole seam to open up.  You don't need to seam rip much, since the cups will fold in half easily to be place in between the layers.


Then I pinned the cup into the exact spot it was fit in.


Then, at those four pin points, I hand tacked the cup to the lining fabric, leaving enough slack in the stitches.  You want to make sure there is enough slack so things won't pull funny when the dress is stretched onto the body!


That's it!  My friend is now ready for a date to El Circo Cheapo!


Your playlist for this dress is the most recent This American Life episode: Blackjack.

Monday, June 13, 2011

project: tiffany's travel pillow

I came across this fabric at The Needle Shop a few weeks ago, and the first person I thought of was my good friend Tiffany. She participates in various moped groups around Seattle and Portland, and I NEEDED to make something out of this for her.

What better thing to make than a moped travel pillow??


Side 1

The fabric is a Kokka cotton/linen blend, and the pillow is a 16 x 16 inch square. I cut the fabric about 15 3/4" to start. I also tapered in the corners about 1/2", so the pillow corners could actually fill out the case.


Side 2

I'm a huge fan of this colorway as well. The royal purple, orange polka dots and lime green stripes on a beige background is just working for me. It's bring, but not too bright. Perfect for all those summer travels!

The pillow is being mailed off today, and I can't wait till she starts a blog about all of her travels with this pillow (nudge, nudge).


Friday, April 22, 2011

project: girl of a 1,000 dreams tunic

It's been awhile. And not because I haven't been working on projects. I've just been, busy. Life stuff.

I found this Jay McCarroll fabric at The Needle Shop not long ago, and after making Tammie her Common People Tunic, I had to have one of my own. So this is what we got.


I used the same pattern at Tammie's tunic, only shortened it up a little bit. It hits about the high hip on the body. I'm in love with the print (the actual colors are more of a pale salmon and charcoal; perfect with some gray leggings) and am in the process of bidding on some white Wayfarer Ray Ban's.


Now, all I need is the proper *warm* weather.

Oh, and I was listening to the new Pains of Being Pure at Heart album when stitching this up. Hence the name of the tunic.

Friday, March 4, 2011

project: spring birds shift dress

Okay, so here is my secret to these spring dresses. I'm not being totally original here (but, when it comes down to it, most of fashion today isn't). What I've been doing, as my main source of inspiration, is to go to the websites of stores I often shop at, look at their spring collections, and knock them off.

The joys of being a patternmaker.

It's true. That where this dress came from. Of course, it is a basic shift dress. But I had the idea in mind after seeing this Anthropologie dress. I then went to the Needle Shop (my new FAVORITE place to purchase all fantastic fabrics) on a sunny Friday afternoon. With the Anthropologie dress in mind, I saw this printed fabric by Kokka, and knew exactly what to do with it. A few days later, I had a pattern, a fitting, alterations, and a finished product.

Front view


Side view

The pattern I made only has two bust darts in the front, and I decided to add two fish-eye darts in the back (to give it some shape, and to also help the fullness swing to the front). There is a center back zipper, and for the first time in a long time, it is lapped and not invisible! It turned out awesome.


Once the spring flowers are in bloom, many pretty outdoor pictures will be taken! At least I'm ready...

up close photo of the print


playlist: spring bird shift dress

1. "georgia" - yuck
2. "bochicha" - DOM
3. "crash" - the primitives
4. "woe is me" - the walkmen
5. "should have" - cloud nothings
6. "bushwick blues" - delta spirit
7. "3rd planet" - modest mouse
8. "yea yeah" - matt & kim
9. "left this world" - la sera

Monday, February 28, 2011

project: spring hipster dress

First blog of the new year! It only took two months (though I guarantee you that I have been working on enough projects that could fill an entire months worth of blog posts). I wasn't keeping a list of all my projects these past two months, and missed out on taking some pictures, so we're going to start with the most recent one.


I visited my BFF in LA last month, and we went to the International House of Silk and Woolens for a quick look around. The weather was so perfect, I had spring on my mind. I purchased two different printed cottons for myself, and one for Tammie (future post to come).

When I saw this first print, I knew exactly what I wanted to pair it with to make a Wicker Park spring dress. Remember those Grounded Earth tote bags from back in December? Yeah, that leftover fabric!


I finally had a free moment a few weeks ago to whip up the top pattern (armhole princess lines were used) and the skirt was gathered (but included pockets!). Since the denim top has some stretch in it, there was a little challenge in getting the bust curve seams to lay flat. But it fits! Looks super cute! And I just ordered a pair of black Toms - sounds like the perfect Urban Outfitters ad!


playlist: spring hipster dress

1. "can't stay awake" - cloud nothings
2. "only one" - smith westerns
3. "die" - iron and wine
4. "dusted" - no age
5. "adventures in solitude" - the new pornographers
6. "jumping fences" - the olivia tremor control
7. "loro" - pinback
8. "south carolina" - tennis
9. "green eyes" - wavves