Sunday, January 20, 2013

project: nightfall shawl

While visiting my sister over holiday in Greenville, South Carolina, she took me to her LYS and immediately showed me this incredible yarn called "Nightfall."  I was really confused at first, seeing the two colors at opposite ends of the skein.  Then she showed me the sample shawl in the shop.  And then the socks.  MIND. BLOWN.


The shop was almost clean of their stock in both the shawl ball and sock yarn in this brand, so I grabbed the one shawl ball that was left to give it a shot.  The colorway is Olive, though it looks more yellow than green (especially when it was knit up).

I went on Ravelry to browse what other people have been making with their shawl ball, and came across a pattern called Wippoorwill and decided to go with it for this project.  I went with the small size, since I wouldn't have the yardage for the medium or large sizes.  I knew I wouldn't use the whole skein for the project, but I was okay with that.

 Finished Wippoorwill shawl

The pattern was easy to follow and had enough going on to keep interest.  Stitch count is a MUST with this pattern, which made it a little stressful at a times.  I didn't realize until after the fact, but I knit this shawl on a size 5 needle instead of 6 (DOH!).  I don't think it made that big of a difference, but I do wish that I could have had a larger shawl in the end.  This one is going to be more of a cowl instead of a shoulder wrap.


I'm kinda glad it didn't use the whole skein, as part of me thinks the shawl would have started to look a little bumble bee.  I'm glad I started with the black end instead of the Olive end, as I think it had more of a dramatic effect this way.  


The little specks of Olive early on in the skein are really lovely, and still put a smile on my face.  The skein was $26, so I don't think this will be a regular purchase for me, but an occasional treat.  I would like to try out the sock version of Nightfall in the future!

In the meantime though, I am focusing on my 2013 resolution of using up my stash!!
 
Another resolution is to blog more and work on those playlists....

Tuesday, June 19, 2012

project: friendship bracelets

I've had friendship bracelet fever the past few days!  I don't know if it's the early 90's trend that is happening all over Wicker Park, or just the fact it's finally summer, but all I want to do is make friendship bracelets!

I pulled out my old embroidery floss, and looked up a basic diagonal pattern for the bracelet (I'm not really into the chevron bracelets at the moment).  Back in grade school (and let's face it, high school) my sisters and I would spend hours on end making these bracelets.  It only took a read through of the instructions for it all to come back to me...

This was the first bracelet I made for myself
(yes I made one for myself)

Here is my mom's bracelet

Here is Daniel's bracelet

I also made one for my friend Tammie, but that got sent in the mail pretty quick.  There are many more friendship bracelets to come! 

Friday, June 15, 2012

project: faking a cover stitch hem

I love working with knits; they are a fabric that usually gets passed over by home sewers because in-experience working with them or not having a serger at home.  One other reason they get passed over is because most knits (say, t-shirts) we purchase in the store, is that it's sometimes difficult to replicate the finishing techniques at home.

Worry no more.

It's maxi dress season here in Chicago, and I purchased two of them and both were too long on me (even in 4" wedges).  They are made of a modal jersey fabric, so they are super drapey and stretchy.  They are, by far, the most comfortable thing to wear on a warm summer night while patio sitting.

I finally got around to hemming them, and since I don't own a cover stitch machine to create the hem the dresses came with, I had to fake the hem.  The hem I'm talking about is that that double stitched hem you see at the bottom of your t-shirts or knit dresses.  The one that has the two stitches on the right side, and loops on the wrong side (or inside) of the garment.  Yeah, that one!

So this is how we fake it, and you do need a serger.  Start by cutting off the excess fabric, and then you are going to do a single layer serge along the raw edge to give it a clean finish. 


Then you are going to pin up your hem allowance (I usually like to do a 1" hem on knits to give them some stability and weight).  PLEASE NOTE: if your knit is extremely drapey or super stretchy, you might want to fuse a layer of tricot interfacing to the raw edge line.  This will help give the knit even more stability and structure when you're sewing.  I didn't do this, because my knit is a medium weight and was controllable.

When you're pinning your hem up, you will want to pin it from the RIGHT SIDE OF THE FABRIC.  This is the side we are going to be stitching on.  Tricky, I know, but the end result will be worth it.

The next thing you're going to do is thread a DOUBLE NEEDLE on your machine.  Yes, we will be using a double needle!  I tend to use the little wider needles (say, 4mm), but it's up to you.  Be sure your presser foot has an opening wide enough to fit the double needle!  I can't count how many times needles have busted because the foot opening was small.

Double needles are really easy to use and look awesome on the fabric.  I did increase my stitch length ever so slightly to help with the tension of the needles and the knit.

The next step is, from the right side you have pinned, use the serged edge of your fabric (that is on the under side now) as a guide to line up along your foot as you begin to sew.  The closer you can get the double stitching to the serged edge underneath, the more it will look like a cover stitched hem.  Be sure to back stitch at the beginning and end of your rows!

This is what the hem should look like when it's all done!

Here is a right side/wrong side view of the finished hem

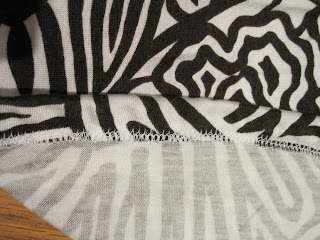
Here is a close up of the wrong side

And that's it!  Now you should be fearless of knits and faking a cover stitch hem!  I'm pretty sure I will be wearing one of these maxi dresses to the Taste of Randolph fest tonight too.  Los Campensinos! and Those Darlins are playing, and I couldn't be more stoked!


Sunday, June 10, 2012

project: bra cups

It's summer, y'all, which is the season of slinky summer dresses!  My friend purchased a dress that is an ideal summer dress, but it had one problem: you can't wear a bra with it.

No way a bra could be worn with this hot number!

So here is the tutorial on what to do when bra cups are a necessity:

First thing is to have your lady try on the dress, and position the cups in the right spot on her.  Gravity is a tricky thing, so make sure she is not wearing a bra so the cups will be in the perfect position when the dress is worn!

Pin the cups into place from the outside of the dress, and then you will want to figure out the best place to seam rip to place the cups it between the fashion fabric and the lining.  Be sure to either thread mark or pin an outline where the cups will be placed inside the layers before you remove the original fitting pin!


I decided to use the armhole seam to open up.  You don't need to seam rip much, since the cups will fold in half easily to be place in between the layers.


Then I pinned the cup into the exact spot it was fit in.


Then, at those four pin points, I hand tacked the cup to the lining fabric, leaving enough slack in the stitches.  You want to make sure there is enough slack so things won't pull funny when the dress is stretched onto the body!


That's it!  My friend is now ready for a date to El Circo Cheapo!


Your playlist for this dress is the most recent This American Life episode: Blackjack.

Sunday, December 11, 2011

project: karma's winter sweater

Karma, all tuckered out in her new sweater


Karma is a Florida dog, and will always be a Florida dog. Which is why her haircut is still always a 1/4" shave. But the temperature here in Chicago finally dropped the other day, and I knew that she was gonna be one cold puppy if I didn't get this sweater done.

This sweater is actually a second go around. I've been wanting to make Karma a sweater since moving to Chicago, but didn't like any of the patterns out there. So I decided to take matters into my own hands. Last winter I went to Target, purchased a dog sweater I liked and that would fit her, took all the measurements from it as well as some pictures, and returned it. Then I started coming up with my own design based off the yarn I was going to use and the final look I wanted it to have.

I used Malabrigo Rios yarn for both sweaters, which was perfect since it's a superwash wool and a great mid-weight yarn. The colorway shown in the pictures here is Candombe. I used a size 7 needle for both straight and circular.


The first sweater came out too big and a little short in the chest area. So I decreased this pattern by about 8 sts all over, and added a turtleneck collar. It still seems a little short in the chest area again, so this dog might be so lucky as to get a third sweater by the time winter is over. If that one works out, I'll write up the pattern for it and post it for my fellow puppy loving knitters!
She's a little camera shy


I also put together a wintery holiday playlist!

playlist: karma's winter sweater

1. "i do not care for the winter sun" - beach house
2. "artificial snow" - atlas sound
3. "kindle a flame in her heart" - los campensinos!
4. "star witness" - neko case
5. "17" - youth lagoon
6. "christmas wrapping" - summer camp
7. "sister winter" - sufjan stevens
8. "gift" - firebird band

Friday, October 28, 2011

project: seed bombs

I know it just turned to fall, but I'm already thinking about the spring planting season. Having a garden this summer taught me so much about seeding, growing and the local garden community. It's funny that once you start gardening, especially in an urban setting, you start looking at empty plots as a place that could hold a community garden. And while most of us don't have that much time to actually garden (I can't begin to tell you how many hours I logged in the garden this spring/summer season), seed bombs are an alternative to that time.

Seed bombs were first introduced to me early this spring, and the concept of them boggled my mind. There are seeds in this tiny little clay ball? Lots of beautiful wildflower seeds? And all I have to do it toss it and it will break apart and start growing?? WHAT??!!!

Herb Seed Bombs

I had to make my own, and finally got some time this past weekend to spend it outside and in the sun. I made two different kinds: a herb mix and a save the bees flower mix. I used a red powder clay and compost (from my worm bin) to mix the seeds with some water. The ratio for the mix is about 5:3:1:1.

The whole process took about an hour or so. Then balls sat for a few days to dry out. While they were drying out, I decided to make some pouches for them out of leftover fabric.

I have lots of scrap fabric around the apartment...


Yesterday was the first day they were ready to go! An Etsy store is in progress, and I can wait to make more with different seed varieties!

Save the Bees Flower Seed Bombs

Monday, June 13, 2011

project: tiffany's travel pillow

I came across this fabric at The Needle Shop a few weeks ago, and the first person I thought of was my good friend Tiffany. She participates in various moped groups around Seattle and Portland, and I NEEDED to make something out of this for her.

What better thing to make than a moped travel pillow??


Side 1

The fabric is a Kokka cotton/linen blend, and the pillow is a 16 x 16 inch square. I cut the fabric about 15 3/4" to start. I also tapered in the corners about 1/2", so the pillow corners could actually fill out the case.


Side 2

I'm a huge fan of this colorway as well. The royal purple, orange polka dots and lime green stripes on a beige background is just working for me. It's bring, but not too bright. Perfect for all those summer travels!

The pillow is being mailed off today, and I can't wait till she starts a blog about all of her travels with this pillow (nudge, nudge).